In this tutorial, we are going to cover jwt authentication in Asp.Net Core 3.1 web api in visual studio code. We will see how to implement identity, and then we will see how to implement token based authentication in Asp.Net Core 3.1 web API, and then finally we will test our API using postman.
In one of the previous tutorials, we have discussed how to implement token based authentication in Asp.Net Core 3.0 web API.
What will you learn in this tutorial?
In this tutorial, we will learn these below points.
- How to add identity in Asp.Net Core 3.1 web API?
- How to create a jwt token using the interface in Asp.Net Core 3.1 web api?
- How to test token based authentication web API using Postman?
Note: – In one of the previous tutorials, we have covered how to integrate react and asp.net core 3.1 application using vs code. So, we will not create a new web API project in this tutorial, we will use the same project which we have created in one of the previous tutorials.
How to implement jwt token based authentication in Asp.Net Core 3.1 web API
Let’s start to implement jwt token based authentication in Asp.Net Core 3.1 web API using vs code.
Step # 1: How to implement Microsoft Identity in Asp.Net Core 3.1 web API?
In this step, we will implement the identity in our application using step by step. So, let’s start with installation
Install Package:
So, first-of-all, we will install Microsoft Identity Package using the below command as you do see below in the screenshot.
dotnet add Domain/ package Microsoft.AspNetCore.Identity.EntityFrameworkCore --version 3.1.0
Note: – the green highlighted “Domain” word is specifying the project which we are installing this package.
Now, go to project folder structure, and then go to the Domain folder and then Domain.csproj file and then you will see the identity package reference is added.
Add ApplicationUser class:
Now, add a new class with the name of “ApplicationUser” within the Domain project and then write some code as you do see below in the file.
Note: – we are inheriting this ApplicationUser class from IdentityUser class. So, don’t forget to add reference.
Changes in DataContext class:
Now, go to the BookStoreDb project and then open the DataContext class and then write some code as you do see below in the file.
Note: – this file is created in one of the previous tutorials. So, if you don’t know how to create a DataContext class, then click here.
Let’s understand the changes.
Line # 8: In this line, we are inheriting this class from the IdentityDbContext class.
Line # 16: In this line, we are calling the OnModelCreating method and passing the builder.
Note: – rest of the file is the same as in one of the previous tutorials.
Update Database:
Now, go to the terminal and then run the below command to create a migration.
dotnet ef migrations add "AddedIdentity" -p BookStoreDb -s API/Now, run the below command to update the database.
dotnet ef database update -p BookStoreDb -s API/After successfully running these below two commands, you will see the output as you do see below in the screenshot.

Configure Identity in startup class:
Now, we will configure identity in the Startup class. So, go to the project folder structure and then go to the API project and then go to the Startup class and then add the below Identity Service within the ConfigureServices method.
Seeding User to Database:
Now, in this step, we will add some demo data for the user account to the database. So, go to the BookStoreDb project folder and then add a new class with the name of “SeeDb” and then write the code as you do see below in the file.
Now, go to the Startup class and then write the code as you do see below in the file’s line # 47.
Let’s understand the above code.
Line # 36 to 38: here in this line we are adding Microsoft Identity Service.
Line # 47: here in this line, we are initializing the SeedDb class to create a new user.
Now, run the API project and then you will see a new User has been added in the database as you do see below in the screenshot.

Step # 2: How to implement jwt token based authentication in Asp.Net Core 3.1 web API?
In this step, we will implement jwt token based authentication in Asp.Net Core 3.1 web API.
Add Login and User Modal Classes:
Now, go to the Domain project folder and then add a new class with the name of “Login” and then write the properties as you do see below in the file.
Now, add another class with the name of “User” and then write the properties as you do see below in the file.
Add Interface:
Now, in this step, we will add the interface. So, go to the API project and then add a new folder with the name of “Interfaces” and then add a new interface with the name of “IJwtToken” within the Interfaces folder as you do see below in the file.
Add JwtToken Logic
Now, in this step, we will add Jwt token based authentication logic.So, first-of-all, we will install some nuget packages. So, run the commands as you do see below in the screenshot.
dotnet add API/ package System.IdentityModel.Tokens.Jwt --version 6.5.1dotnet add API/ package Microsoft.AspNetCore.Authentication.JwtBearer --version 2.1.0

So, go to the API project folder and then create a new folder with the name of “Security” and then add a new class with the name of “JwtToken” within the Security folder and then write the code as you do see below in the file.
Let’s understand the above code.
Line # 16 to 19: here in this block, we are creating a list of claims.
Line # 20: Here in this line, we are generating the security key.
Note: – if you want to know how to add TokenKey (“super secret key“) in Asp.Net Core user secrets, then click here.
Line # 21: Here in this line, we are creating signing credentials with two parameters. One is the security key and the other one is the algorithm.
Line # 22 to 27: Here in this block, we are describing some data about our token.
Line # 28: Here in this line, we are creating a token handler.
Line # 29: Here in this line, we are creating a token and passing it to the token variable.
Now, go to the startup class and then add some services as you do see in the below code file’s line # 63 to 75 and line # 88.
Note: – if you want to know how to add TokenKey (“super secret key“) in Asp.Net Core user secrets, then click here.
Note: – don’t forget to add references.
Create User Controller:
Now, in this step we will create a user controller. So, go to the API project and then go to the Controllers folder and then add a new class with the name of “UserController” and then write the code as you do see below in the file.
Let’s understand the above code:
Line # 33 to 35: Here in this block, we are getting a user by email. If the user is null, then it will throw an exception “user authentication error”.
Line 36 and 37: Here in these lines, we are signing the user.
Line 39 to 46: Here in this block, if the result is succeeded, then it will return the user object with the token.
Line # 44: Here in this line, we are calling the “CreateToken” method. Which will generate the token and then return it to the JwtToken property.
Add Authorize Attribute
Now, go to the UserController and then add this below method with the Authorize tag as you do see below in the code file.
Line # 1: Here in this line, we are adding the Authorize tag. It will help us to authenticate the user. For example, if the user is authenticated, then it will be able to access this method otherwise the user will not be able to access this method.
Step # 3: How to test token web API using Postman?
In this step, we will see how to test authentication using web API. So, run the API and then go to the Postman.
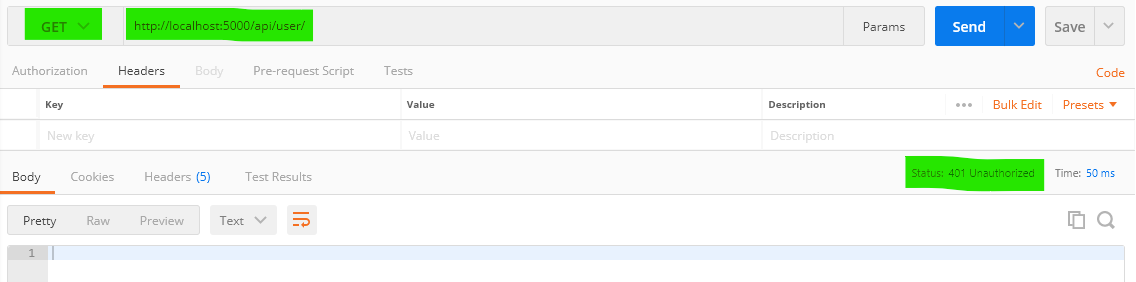
Now, enter the API path (http://localhost:5000/api/user/) and select the Get method and then press the Send button as you do see below in the screenshot.
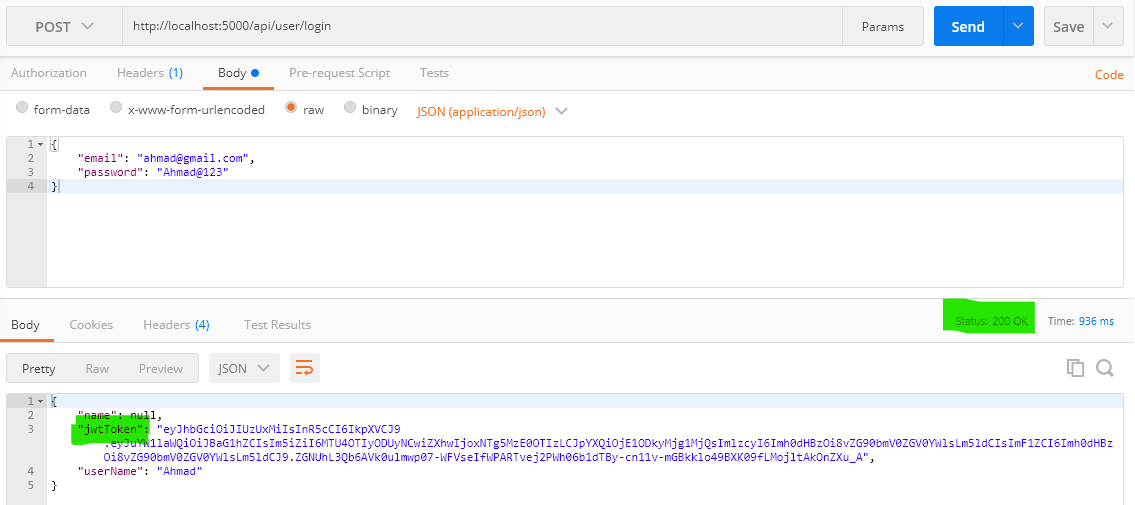
Now, we will generate the token using the login method by passing the username and the password which we have created above as you do see in the below screenshot.

Now, if this above request is generated successfully, then you will see the output as you do see in the screenshot.
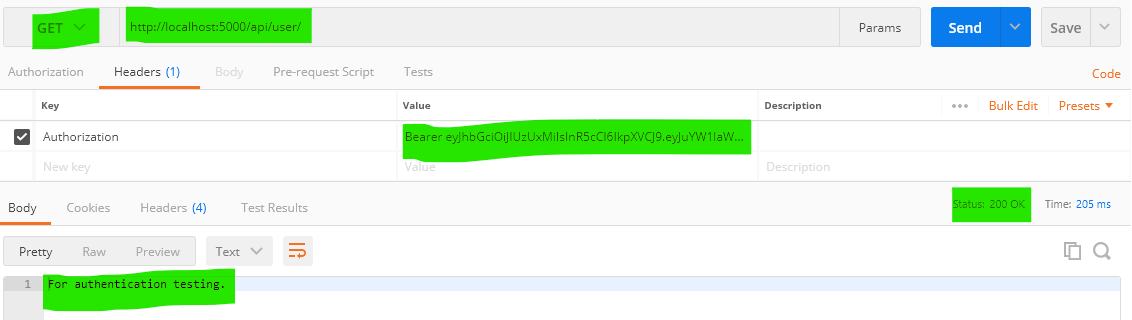
Now, copy the token value and then paste it into the token text area and then request this path (http://localhost:5000/api/user/) again with the token value as you do see below in the screenshot.

Now, if the above request is generated successfully, then you will see the output as you do see in the below screenshot.
Congratulations! We have successfully implemented Token based authentication in Asp.Net Core 3.1 Web API application.
Leave a Reply